The Volunteer Page provides the abillity for donors to indicate an area of interest and times that they are available to volunteer for your organziation. It does NOT specifically sign them up for that time but provides that information to you so that you can contact them as needed. The process for designing the page is the same as the other DIY pages. You can select and position the controls on the page then publish the page using the provided URL.
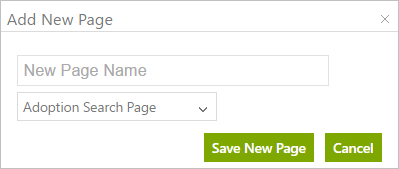
To create a Volunteer Page, click the Pages tab. Click Add New Page.
Give the page a Name and then, in the drop down field, choose Volunteer Page. Click Save New Page and that will return you to the list of pages. Click the Edit button next to your new page to finish the layout.
From this point forward, the page layout process is the same as the
Donation Page except that there are different controls available for this page.
This page requires that you select a
Giving Option from the that field found in the
Manage this Page section in the upper right.
Company Controls
There are two controls in this section,
Banner and
Banner Logo. Both controls pull in the information from your
Company Setup page.
Registration - Login Controls
There is only one control available in this section, One Time Login or Registration. It is the form that donors will use to provide you with their contact information.
Volunteer Controls
Volunteer Availability: This control displays a list of days and time sections with check boxes. The donor can check those times that they will be available. The times that are displayed in this control by right-clicking on the control and choosing Properties. When a donor selects their days and times it will be recorded in that person's name record page.
Volunteer Categories: Places a drop down field on the page so that donors can select their area of interest. The areas must be set up by you by clicking on the Codes tab then scrolling to
Volunteer Codes. When a donor selects an area of interest from the list it will be recorded in that person's name record page.
Volunteer Notes: Provides a text box field where the donor can make notes.
Volunteer Submission: This is the button that usually appears at the bottom of the page. It allows the donor to submit their information. Their notes will be recorded in that person's name record page.
Generic Controls
In addition to the specific types of controls you also have Generic Text, Generic Image, Generic Line, Generic Link, and Generic Expaner. These all work in the same way as those found on the
Donation Page and you can check them out there. However, it is likely that you will want to add a message to your donors to the Confirmation Page and to do that you can use the Generic Text control.
Generic Text: You can add text by clicking the Add button next to the Generic Text control. It will appear in the upper left and you can drag it to where you want it on the page. Now right click and choose Properties.
Click in the box and begin typing your text. A toolbar appears at the top to allow you to underline, bold, change fonts and colors, etc. just like you would in a word processor like Microsoft Word. Click Close to finish adding your text. Now you can format it further by right-clicking the control and choosing Edit HTML. You can change the size of the text box, align it left, center, or right, change the font style and size and also change the color of the text there. You can even add a background image to the text box.
Generic Image: You can add an image or text as well. Click the Add button next to the Generic Image control to add that to the work area. It will appear in the upper left corner and you can drag it to where you want it to be. Now right-click on that control and choose Properties.
Click the Image Gallery button. You can select one of the images that are already in your library or you can click the Upload Additional Image button. You can then Browse and select the image you want to upload. Then click on it to select it and finally click Close. Notice that the image is scrunched into that original box. Right-click on the control and choose Edit HTML. Here you can set the height and width that we want for the photo. You can also drag the outline of the control to resize it that way as well. Now you can drag the control to any area of the page that looks best.
Generic Line: A Line is just a visual separator that you can use to create sections on the page. When you click to add a Generic Line, it appears on the page and you can drag it around and/or make it shorter or wider as needed.
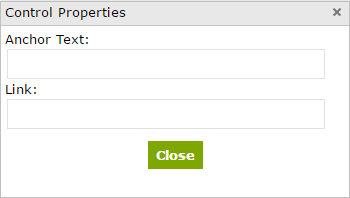
Generic Link: The Link allows you to put links to other web sites or web locations into your page. Click to add the Generic Link.
Enter the Anchor Text. This is the text that the donor will see on the page.
Enter the Link. This is the web page or email address for the link. When a donor clicks on the Anchor Text their browser will direct them to this page. You should enter it as http://www.website.com or mailto:email@domain.com.
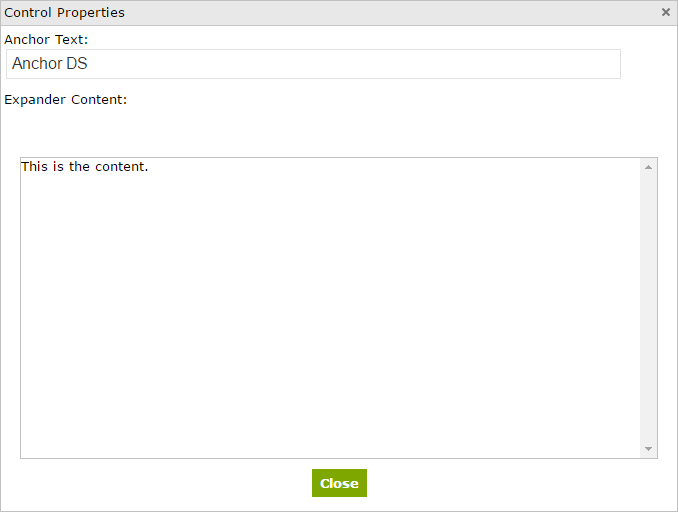
Generic Expander: Allows you to add text that when clicked on, expands and reveals more text. Click the button to add an Expander control to the page. Right-click on the control the Properties.
Enter the line that you want donors to see on the page in the Anchor Text field. Enter the text you want them to read in the Expander Content field and click Close. On the final web page, when a donor clicks on the Anchor text, the Expander text will pop up allowing them to read the full paragraph.
Reports
Producing a list of names based on days, times, and interest can be done by clicking on the
Communication tab at the top of the page. You only need to use the criteria here that you need. For example, you can move to the
Interest Codes field and select the codes for this report. Click in the field to see your list of codes. You can select multiple codes by clicking on more than one. Now
click the List To Screen to see a list of names that meet that criteria or filter. From there you can click the
Export to Excel button to capture that list for mailing or other contact.
You can also send a
Mass Email by first creating a message body by clicking the
Edit Layout button. That gives you a basic page for your message. Click the Mass Email button to send the email. You can also select a
letter body that you've previously created in the
Letters section of the Codes page. When you click the Mass Email button, it will send that letter body as the body of the email.
Another option for email is third-party software like Constant Contact and others. Output your list to Excel then import that to Constant Contact to create a mailing list.
You can also combine criteria. For example, select an Interest Code and then then check a box for Monday PM. Your output will now be limited to those who meet both of those criteria.
Publish
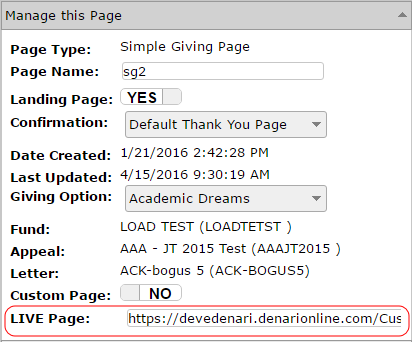
Once your page looks and feels the way you want you are ready to publish the page. Move to the Manage this Page section of the page to find the Live Page field.
Copy the URL there and make that a link on your web site. When donors click that link they will be directed to the page where they can volunteer.